Since I bought a non-working used Rebel 30 I knew I had no warranty going into the project. Using the factory-provided "secret" schematics (few component identifications but enough roadmap for an experienced tech to follow) I repaired the amp (4 distinctly different problems... cracked volume pot, broken Fast-on connector, bad solder joint on a transistor lead and one intermittent solder joint on a resistor). Not the easiest or fastest repair but a long Saturday afternoon did the trick.
While checking the amp for real (with a guitar as opposed to a signal generator and an oscilloscope), I was really digging to tones this little baby creates! I own a couple of Renegades as well so I am not totally inexperienced with the Egnater family tone. After I had about an hour on this little gem with all systems functioning, I noticed how hot the control panel was. None of my Renegades suffered from this heat build-up because they came with fans and top vents! I decided right then and there to add a fan to my Rebel 30.
I decided that a 12Vdc fan was the way to go for low electrical noise plus this was the style of fan used in the Renegades so I wanted to replicate that experience. I looked through my fan collection but the only 12Vdc ball-bearing fan I had in the appropriate size was a fancy blue-LED computer fan. Oh well. a little bling never hurt anyone:
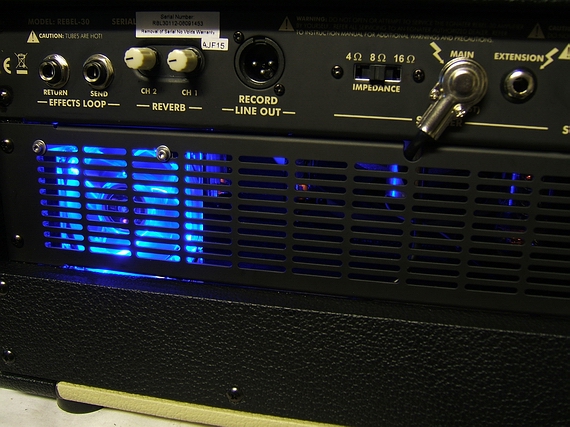
I mounted the fan to the grill through the existing slots (no holes drilled) with two 1/2" standoffs and a few stainless-steel 6/32 screws (with flat washers) I had in my miscellaneous hardware pile. I used a matching computer fan cable to interface the fan to the output PC board (just above the AC cord socket) at the unregulated 16Vdc point (the top wire to the chassis-mounted 12Vdc pass-transistor below) allowed me to have a disconnect point to allow easy amp servicing in the future without having the remove the fan as well. The ground wire was soldered to a convenient ground nearby at the bottom of the board at a Fast-on connection point. I used a 27 ohm 2W resistor in series with the 16Vdc to drop the voltage down to 12Vdc for the fan and tie-wrapped the cabling up to prevent future problems.
Now the amp runs VERY cool and the control panel hovers barely over ambient temperature. I know this will increase the longevity of the amplifier and I feel much better about how cool it runs. This fan does not seem to effect the amp electrically in anyway I can hear or measure. I think this is a thoroughly desirable mod that is relatively easy to make if you are a craftsman of reasonable quality and if you don't have to worry about your warranty. If you regularly record through a microphone rather than the direct output you may want to add a fan switch (which could also mount in the metal grill if you use a mini or sub-mini toggle switch).
NOTE: Before anyone points out that the impedance switch is in the 8-ohm position I want to clarify that I have the matching extension cabinet and I use them as a pair exclusively so the switch is always in the 8-ohm position on purpose. The photos were taken with the amp in Standby mode anyway!
Steve
While checking the amp for real (with a guitar as opposed to a signal generator and an oscilloscope), I was really digging to tones this little baby creates! I own a couple of Renegades as well so I am not totally inexperienced with the Egnater family tone. After I had about an hour on this little gem with all systems functioning, I noticed how hot the control panel was. None of my Renegades suffered from this heat build-up because they came with fans and top vents! I decided right then and there to add a fan to my Rebel 30.
I decided that a 12Vdc fan was the way to go for low electrical noise plus this was the style of fan used in the Renegades so I wanted to replicate that experience. I looked through my fan collection but the only 12Vdc ball-bearing fan I had in the appropriate size was a fancy blue-LED computer fan. Oh well. a little bling never hurt anyone:
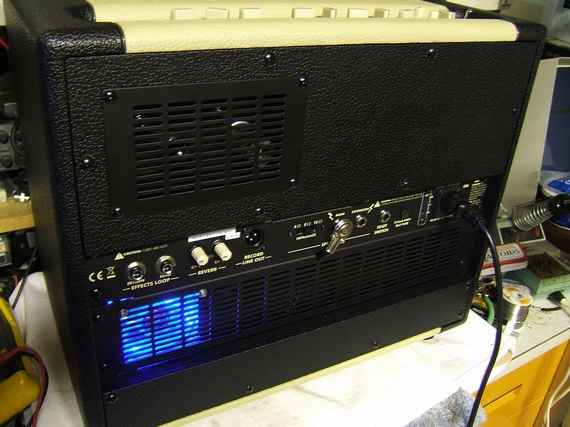
I mounted the fan to the grill through the existing slots (no holes drilled) with two 1/2" standoffs and a few stainless-steel 6/32 screws (with flat washers) I had in my miscellaneous hardware pile. I used a matching computer fan cable to interface the fan to the output PC board (just above the AC cord socket) at the unregulated 16Vdc point (the top wire to the chassis-mounted 12Vdc pass-transistor below) allowed me to have a disconnect point to allow easy amp servicing in the future without having the remove the fan as well. The ground wire was soldered to a convenient ground nearby at the bottom of the board at a Fast-on connection point. I used a 27 ohm 2W resistor in series with the 16Vdc to drop the voltage down to 12Vdc for the fan and tie-wrapped the cabling up to prevent future problems.
Now the amp runs VERY cool and the control panel hovers barely over ambient temperature. I know this will increase the longevity of the amplifier and I feel much better about how cool it runs. This fan does not seem to effect the amp electrically in anyway I can hear or measure. I think this is a thoroughly desirable mod that is relatively easy to make if you are a craftsman of reasonable quality and if you don't have to worry about your warranty. If you regularly record through a microphone rather than the direct output you may want to add a fan switch (which could also mount in the metal grill if you use a mini or sub-mini toggle switch).
NOTE: Before anyone points out that the impedance switch is in the 8-ohm position I want to clarify that I have the matching extension cabinet and I use them as a pair exclusively so the switch is always in the 8-ohm position on purpose. The photos were taken with the amp in Standby mode anyway!
Steve