DIY Project #2 - the 4x10

  • Thread starter Thread starter ratter
  • Start date Start date
ratter

ratter

New member
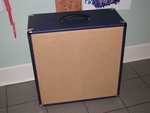
The matching cab for this:

viewtopic.php?f=3&t=44703

Just need to wire up the speakers and it'll be done.

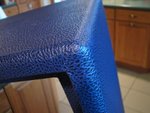
Made some improvements in my corner-cutting technique:


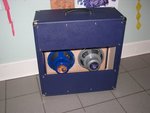
The biggest issue I have is that the baffle was a bit too tight of a fit so as I installed it (pushed in from the front), it pushed the grillcloth a little bit slack. So depending on how much it bugs me I might take it back out, remove the cloth, shave it down a bit to fit looser, and re-staple the cloth. Cane was probably not the best choice to learn with - it's very thick and stiff. :aww:


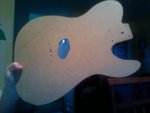
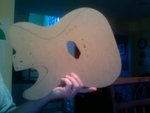
The back. I'm very fond of the stainless screws and grommets. Much nicer looking than the drywall screws some companies use, IMO. Oh, and I know there's no jackplate. I didn't like the one I originally ordered from Mojo, so I have a replacement coming. It will go top-center.


Why are these pictures so tiny. Hmmm...
 

Attachments

  • IMG_3845.jpg
    IMG_3845.jpg
    16.6 KB · Views: 2,889
  • IMG_3846.jpg
    IMG_3846.jpg
    12 KB · Views: 2,890
  • IMG_3847.jpg
    IMG_3847.jpg
    13.6 KB · Views: 2,900
For your first time you are ready doing a great job! Well until I exported the pics into photoshop on my 24" HD capable Sun monitor anyways................. :lol: :LOL: :D

Fantasic job!!!!!
 
Digital Jams":2qqf13f3 said:
For your first time you are ready doing a great job! Well until I exported the pics into photoshop on my 24" HD capable Sun monitor anyways................. :lol: :LOL: :D

Fantasic job!!!!!

Thanks! I'm pretty pleased with it. If I were making them for sale I would be more persnickety but since it's just for me I can let things like the baffle fit slide. And the fact of the matter is I hate ripping plywood (no table saw) and I'm not fond of the tolex work but I needed a headshell, had enough material left over for the cab, and both are good walk-before-you-run practice for what I'm really itching to do, which is build a guitar.
 
ratter":29xl8zwo said:
Digital Jams":29xl8zwo said:
For your first time you are ready doing a great job! Well until I exported the pics into photoshop on my 24" HD capable Sun monitor anyways................. :lol: :LOL: :D

Fantasic job!!!!!

Thanks! I'm pretty pleased with it. If I were making them for sale I would be more persnickety but since it's just for me I can let things like the baffle fit slide. And the fact of the matter is I hate ripping plywood (no table saw) and I'm not fond of the tolex work but I needed a headshell, had enough material left over for the cab, and both are good walk-before-you-run practice for what I'm really itching to do, which is build a guitar.

I have a small portable table saw can I can rip 4x8s but sometimes it could get dicey :scared: It does have a table extention but still not one of those big Deltas. I use one of those clamp fences when I work with MDF and just use the skill saw.

Guitar huh?? :Let me know if you want a copy of the Hamer factory tour dvd to see some shit, the guys use grinders to create the carvetops and old cabinet french curves to shape them. Pretty cool to watch if you can get over the sales pitch from Jol :lol: :LOL:
 
Nice job. Head and cab look great. :thumbsup:

Looks very well done for your first go! :yes:
 
Great Job!!!

You should have sprayed the inside/back black or something.
 
Right now it just has two speakers in it - a weber alnico blue pup and alnico silver whatever...30 watters.

Also, I figured out a way to fix the grille cloth. Took the speakers out, sprayed the cane with water until it was soaked through. Then used a hair dryer on high heat to blow it dry. Now it's tight as a drum...
 
First, great job! That corner is perfect. I'd have left the metal corners off.

Second, can you share your technique for doing the corners? I've done cabs before and would love to know how you did them. Pics of my cabs are here:

http://www.dafguitars.com


Thanks.

Dave
 
dfrattaroli":alvqaey9 said:
First, great job! That corner is perfect. I'd have left the metal corners off.

Second, can you share your technique for doing the corners? I've done cabs before and would love to know how you did them. Pics of my cabs are here:

http://www.dafguitars.com


Thanks.

Dave


Thanks! And yeah, no problem - it looks like I did mine very similar or maybe even the same as yours. Sorry I don't have pics. But I wrap the tolex like you do to this point:

tolex_application3.JPG


...then make that first cut from the corner out to the edge of the tolex to separate the top piece from the side piece. But not exactly at the corner - I did it slight off to the top side if and pretty deep too - deep enough to get past the roundover to the flat wood. This seemed to minimize the little point/lump that shows up at the corner of the seam sometimes.

It was cold when I was working and the tolex was cold when I made the cut. Then I hold each piece in one at a time like you're doing here and make the cuts parallel to your tape so that they'll wrap inside and then peel them loose again:

tolex_corner_2.JPG


So at that point three cuts have been made but nothing is stuck yet and the final corner miter cut hasn't been made yet. Next I get the hair dryer and blast heat on the part that's going to be on the corner coming in from the side (the piece with tape on it in the pic above). Get it hot and flexible and then stretch it very slightly across and smooth it down into place. It should go down very smooth with no bump at the top. It will look like your pic above, but left stuck in place this time. Then heat the corresponding top piece and pull it down smooth over the corner and hold it in place with tape (since it's sitting on the other piece of tolex and won't stick yet.

Then from the peak of your corner seam, cut down through both pieces of tolex, from the outside corner to the inside corner. This is the hardest part and something that I could probably improve because a) you can't see the inside corner under the tolex so you have to guess/feel for it a bit and b) the overlapping piece still wants to move sometimes as you cut, even though you tape it down.

But if that last cut comes out well, you can peel everything back again, remove the pieces that just got cut out and you can restick the corner and it should have a nice clean seam. The best ones I did, you couldn't even feel the seam running your fingers over it and you could only find it if you looked closely.

The other things I did....I cut all 4 corners on one side like that, but left them all unstuck until I had all 4 cut, then went and stuck them all in place the final time. Because once you cut and stick one corner I kinda found it hard to work an adjacent corner because the tolex was already partially wrapped under.

Also, I cheated the cure time a bit by starting probably a few minute before it was truly ready to be stuck...to give myself extra 'peel and stick' time. If a particular piece wasn't sticky enough because I was too early, hitting it with the blow dryer would get it tacky and make it stick. I used DAP Weldwood Non-Flammable.
 
dfrattaroli":o52v8zgz said:
First, great job! That corner is perfect. I'd have left the metal corners off.

Second, can you share your technique for doing the corners? I've done cabs before and would love to know how you did them. Pics of my cabs are here:

http://www.dafguitars.com


Thanks.

Dave

ps - here's DIY project #3 in the embryonic stage - looks like I'm going to have lots of questions for you! :D


Attachments

  • 890.jpg
    890.jpg
    27.2 KB · Views: 2,418
  • 891.jpg
    891.jpg
    29.3 KB · Views: 2,431
ratter":517lmmig said:
dfrattaroli":517lmmig said:
First, great job! That corner is perfect. I'd have left the metal corners off.

Second, can you share your technique for doing the corners? I've done cabs before and would love to know how you did them. Pics of my cabs are here:

http://www.dafguitars.com


Thanks.

Dave

ps - here's DIY project #3 in the embryonic stage - looks like I'm going to have lots of questions for you! :D


Thanks for your help with the corners! Fire away!

Dave
 
Back
Top