steve_k
New member
The ultimate modded Marshall from the next amp guru, Dan Gower. Well, he already is "that guy" in my book. Awesome dude to work with and a spot-on ear for tone. You get this when your amp builder just happens to be monster player who plays live with his own creations. We did a few extra things that I wanted in the amp, such as a foot-switchable 2nd Master and foot-switchable access to the gain boost in the KK mode, compensated line out, active tube loop, external bias, etc. This was made from a 76 JMP Super Bass that had no shell, no tubes and hadn't been fired up for years. It was pretty much a complete rebuild for Dan. Unlike the predecessor to the KK++, this is all tube gain - no clip circuits, no Jose masters. Dan has built so much EQ control into the amp that you can really make this thing bloom. The two gains and their bright cap selections and the mid shift alone is enough to dial up a myriad of tones. But, add in the Glass (NFB) and Depth and it really gets out there where no Marshall has ever ventured. Then, there's the Violence which adds the final gain stage and sends this amp into a whole new level of "holy shit".
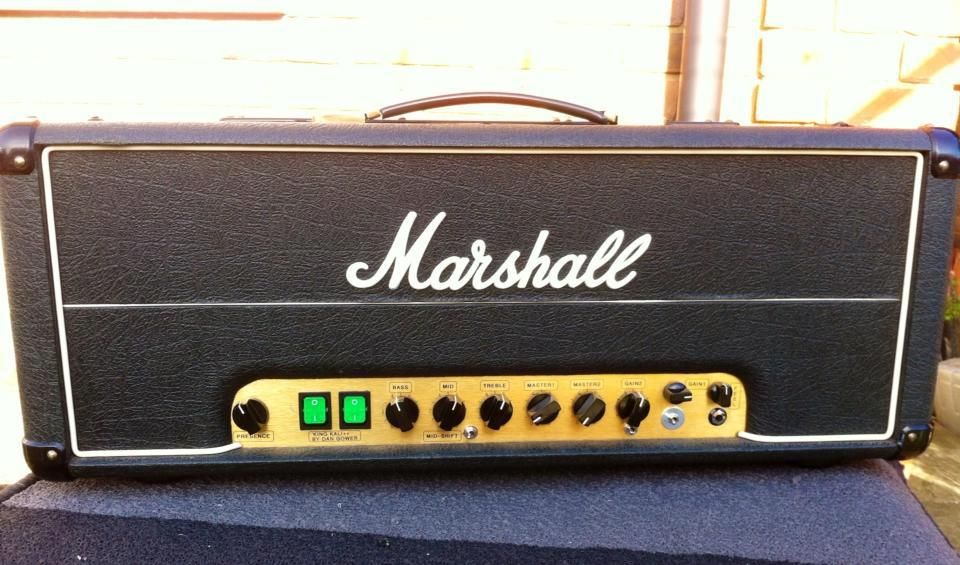
I have only had about an hour total with this amp, but it is the cream of the Marshall crop. Other amp guys could take lessons from Dan, that's for damn sure. Here's a front shot of the amp and also below is something cool that Dan does....he actually takes the time to explain the controls and switching, bias, etc. And, he also includes some example settings he found with the amp doing his own testing. Can't say as I recall a modded Marshall ever coming with this sort of info.
Anyway, this is my 2nd amp from Dan. The other is my Aldrich that he built. He has another chassis of mine now and is doing an authentic Arredondo mod. Straight-up, no frills, no extra's. If anyone is interested, he is also able to do a Langner mod which is another kick ass amp to come. If you want a truly customized Marshall mod for your needs, Dan is the man. And, he's near my time zone!
KING KALI++ MOD USER GUIDE FOR STEVE KING
The first 2 Gain pots each have a switch below them. These are bright switches that allow you to select 2 different cap values, and the centre position is no bright cap.
With the switches in the left setting, it adds more gain and thickness to the tone. With the switches set to the right position it is brighter and thinner sounding in comparison. The higher the gain settings, the less effect the bright switches will have.
Working both gain pots in different settings with all the combinations of the bright switch positions gives you a plethora of options to tailor your tone.
The 'Feel' Control allows you to dial in the overall 'Feel' of the amp (tight/snappy or spongy/compressed etc). Start out with the pot at zero for the tightest setting and as you turn the pot clock-wise, it will bring in more thickness and more of a compressed/spongy feel.
Master Volumes 1 and 2 are foot-switchable, designed for use as a solo volume boost. Master 1 is the default control and Master 2 is engaged via foot-switch.
The Mid-Shift switch allows you to fine tune the mid-range and re-voice the entire EQ section. There are 3 positions/settings to choose from : the left setting gives the pushed upper mid-range like the classic Plexi voicing. The centre position is more of a scooped midrange setting. The setting to the right is more balanced and sits somewhere between the left and centre settings tone-wise.
The rest of the front panel controls (Treble/Mid/Bass/Presence) work as usual.
On the rear panel of the amp you will see a control which is called 'Violence'. This is the Gain control for the Killer Kali++ circuit and allows you to dial in the amount of gain from the extra tube gain stage. This control is also a push/pull switch, when pulled it engages the Killer Kali++ circuit. If you are using the foot-switching functions, make sure that this control is pushed in.
The Depth control is like your Presence control but for the bass frequencies. This control adds in that big modern low end from the power section of the amp. This control is also a Push/Pull which engages the Thump switch when pulled out. The Thump setting is much deeper and thicker sounding. With the Depth control pushed in, it's more of a low midrange boost which makes the tone much more chunky sounding.
The Glass control adjusts the negative feedback in the power-amp. With the control set at zero, you have the darkest/smoothest tone available and as you turn the control further clockwise you can make the amp sound much brighter and more present/aggressive. There is a large amount of sweep with this control, so don't be afraid to turn it all the way up if you like the tone brighter. I recommend setting it to 12 o clock as a starting point. Then you can dial in more or less if needed.
CUSTOM OPTIONS
PARALLEL FX LOOP:
The Send Jack is to be connected to the input of your FX unit/pedal. The Send level is preset and will work flawlessly with both pedals and racks. The Return Jack is to be connected to the output of the FX unit/pedal.
Since this is a Parallel FX Loop, you must set your FX unit so that it’s output signal is 100% Wet. Many Rack FX (and many modern FX pedals) have a function called KILL-DRY which you can engage, and it will make the output 100% Wet. When using certain pedals/racks that do not have KILL-DRY, you may have to set the Level/Mix on the unit all the way up (max) to achieve a 100% Wet output.
FOOT-SWITCHING:
There are two foot-switching jacks on the amp labeled 1 and 2. Jack 1 is a regular mono jack, while Jack 2 is a Stereo/TRS type jack that switches 2 foot-switching functions. The switching is activated by shorting the tip or ring connections to ground. This can be done either with a foot-switch or using an RJM Switcher (Amp Gizmo/Mini Amp Gizmo etc).
Foot-switch jack '1' : Tip = activates 'Killer Kali' Mode
Foot-switch jack '2' : Tip = Master1/2, Ring = FX Loop Bypass
The FX Loop is always ON by default, and engaging your foot-switch will bypass the FX Loop.
Also make sure the Violence control is pushed in whenever you use a foot-switch.
EXTERNAL BIAS:
Biasing the amp is simple and does not require removal of the chassis. You will need a simple voltmeter or digital multimeter set to the lowest DC voltage range, typically 200mV (millivolts).
1. Unplug any cords from the amp's Input jack, make sure the MASTER volume control is turned all the way down, counter clockwise. Insert a flat tip screwdriver into the bias pot and adjust the bias pot counter clockwise to set the bias to the coldest possible setting. Connect a load to the speaker jack (either a dummy load or your speaker cab will be fine), plug in the AC cord and turn on the amplifier. Wait a few minutes then switch the Standby switch into playing mode (it will light up green).
2. Put the black negative probe lead of your meter into the black test point on the amp. Place the positive red probe lead in one of the red test points on the amp. Now you will see a bias reading appear on your multimeter display. To increase the bias, slowly turn the bias pot clockwise and keep a close eye on your multimeter display.
3. If you look at the chassis, i have labeled the power tube sockets V1/V2/V3/V4. One of the red test points is labeled V1+V2 and the other is labeled V3+V4. When you read the bias from each test point, the reading on your meter will be the pair of tubes combined. So for example, if you read 70mV then it means the two tubes are biased approx 35mV per tube.
For EL34 tubes, i recommend bias settings of between 30mV (cooler) to 40mV (hotter). Hotter bias settings will make the amp sound more gainy, but also will put more strain on the tubes and can shorten their life.
The external bias control on this amp has a much larger range than a stock Marshall, so if you ever decide that you want to install a different tube type (like 6L6, 6550, KT88 etc), there will be plenty of range on the bias control for you to bias them. You won't need to change any components inside the amp either.
LINEOUT:
The Lineout feature gives you the option to slave the amp or run a Wet/Dry/Wet system. The signal is tapped off the amp’s output section, so you’re getting all of the amp’s tone but at a lower signal level.
The Level control adjusts the amount of signal coming out of the Lineout jack. When using the Lineout, you can just use a regular 1/4” guitar cable. There is no need to use a speaker cable for this.
When using the Lineout feature, you must ALWAYS have a load connected to the amp’s speaker jack. It can be your speaker cab or even a dummy load if you wish to run the amp silently, while slaving the signal into another amp.
With a dummy load hooked up, you can even send the Lineout signal into a recording system for silent recording and add speaker simulation in your DAW software using Impulse Response plug-ins.
TUBES:
This amp is based around an EL34 power section. The amp is currently set up to run on EL34 power tubes. For current production tubes, SED Winged C EL34’s are the best choice. NOS tubes (such as RFT/Mullard/Tesla/Siemens EL34 etc) are also great choices as long as they are reasonably well matched.
The entire preamp section of this amp is setup to be used with 12AX7/ECC83 tubes. If you look next to each tube socket you will see i have written labels to identify which part of the circuit they are for (Loop, Input, CF, Gain, PI).
If you re-tube the amp at any point, make sure that you always use Chinese 12AX7 tube in the Loop and CF sockets. These two sockets are both cathode-follower circuits, and most current production preamp tubes will not survive in this position, but Chinese 12AX7's will work fine here without any problems.
SAMPLE SETTINGS
All sample settings were dialled in using Celestion Vintage 30 speakers. If using other speakers, you may have to adjust the settings accordingly.
Stock Marshall Plexi Sound :
Depth off
Glass control set to 2 o'clock,
Presence at 12 o'clock,
Master set between 2 and 3 o'clock,
Gain 2 set to 9 o'clock w/ bright switch set to centre position,
Then use Gain 1 to adjust the volume (just like the bright channel of a 1959) and set the bright switch to the left position.
Feel set at 10 o'clock,
Mid-Shift set to the left
Bass set to 2 o'clock, Mid set to 3 o'clock, Treble set to 3 o'clock.
Violence setting off
Classic JMP/JCM800 style setting :
Depth off
Glass set to 2 o'clock
Presence between 1 and 2 o'clock
Master adjusted to desired volume
Gain 2 set to 1 o’clock w/ bright switch set to centre position,
Gain 1 set to 2 o'clock w/bright switch set to left position,
Feel set at 2 o'clock,
Mid-Shift set to the left,
Bass set to 3 o’clock, Mid set to 2 o’clock, Treble set to 2 o’clock.
Violence setting off.
Hard Rock setting :
Depth 10 o clock pushed in
Glass at 2 o'clock,
Presence at 2 o'clock,
Master adjusted to desired volume,
Gain 2 set to 2 o’clock w/ bright switch set to left position,
Gain 1 set to 3 o'clock w/ bright switch set to centre position,
Feel set to 10 o'clock,
Mid-Shift set to the left,
Bass set to 1 o’clock, Mid set to 2 o’clock, Treble set to 2 o’clock.
Violence on and set to 10 o'clock
High Gain Modern setting :
Depth set to 3 o'clock pulled out
Glass set to 11 o'clock
Presence set to 12 o'clock
Master adjusted to desired volume
Gain 2 set to 2 o’clock w/ bright switch set to left position,
Gain 1 set to 2 o'clock w/bright switch set to left position,
Feel set at 12 o'clock,
Mid-Shift set to the left OR if you prefer a darker tone, try the centre or right settings.
Bass set to 4 o’clock, Mid set to 11 o’clock, Treble set to 1 o’clock.
Violence on and set to 12 o'clock.