BesaMoogie
Well-known member
...or kind of not how I expected.
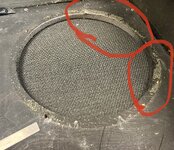
I have this 2x12 combo with G12-65 speakers I wanted to put in a 4x12. After removing the screws, both speakers did not move. So I carefully put a thin metal ruler between the wood and speaker to get a tiny gap. After that I did put a screwdriver in the gap and the speaker started to get loose. I went around the whole speaker carefully lifting it up bit by bit.
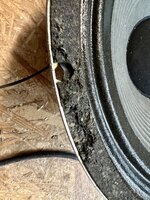
Happiness went away quickly after I saw the result of my work. Quite some of the soft material the edge of the speaker, that makes contact with the cab teared apart and stayed on the wood of the cab.
Any ideas how to fix this? I was thinking of carefully remove the stuff with a razor blade and glue it back to the speaker. Or is there something bettert I could do?
And, is there a way to safely remove the other speaker? At this point I am even not sure, if I want to remove it but I would actually like to have the G12-65 in a 4x12.
I have this 2x12 combo with G12-65 speakers I wanted to put in a 4x12. After removing the screws, both speakers did not move. So I carefully put a thin metal ruler between the wood and speaker to get a tiny gap. After that I did put a screwdriver in the gap and the speaker started to get loose. I went around the whole speaker carefully lifting it up bit by bit.
Happiness went away quickly after I saw the result of my work. Quite some of the soft material the edge of the speaker, that makes contact with the cab teared apart and stayed on the wood of the cab.
Any ideas how to fix this? I was thinking of carefully remove the stuff with a razor blade and glue it back to the speaker. Or is there something bettert I could do?
And, is there a way to safely remove the other speaker? At this point I am even not sure, if I want to remove it but I would actually like to have the G12-65 in a 4x12.