The making of a NGD...let's build another one...

ratter

New member
Episode 1 can be found here.

Let's tackle Episode 2.

This one is still very much in progress so it will have to play out over the coming weeks but a lot is already done.

Episode 1 was a pretty bog-standard Tele copy. This time we're going off the reservation a little bit and building a strat style with my own original body and headstock shapes. We'll go from raw wood all the way through to case candy.

The target is a takeoff on a mid to late 60's style rosewood board strat. But that's just a rough starting point.

The targeted specs are:

Alder body
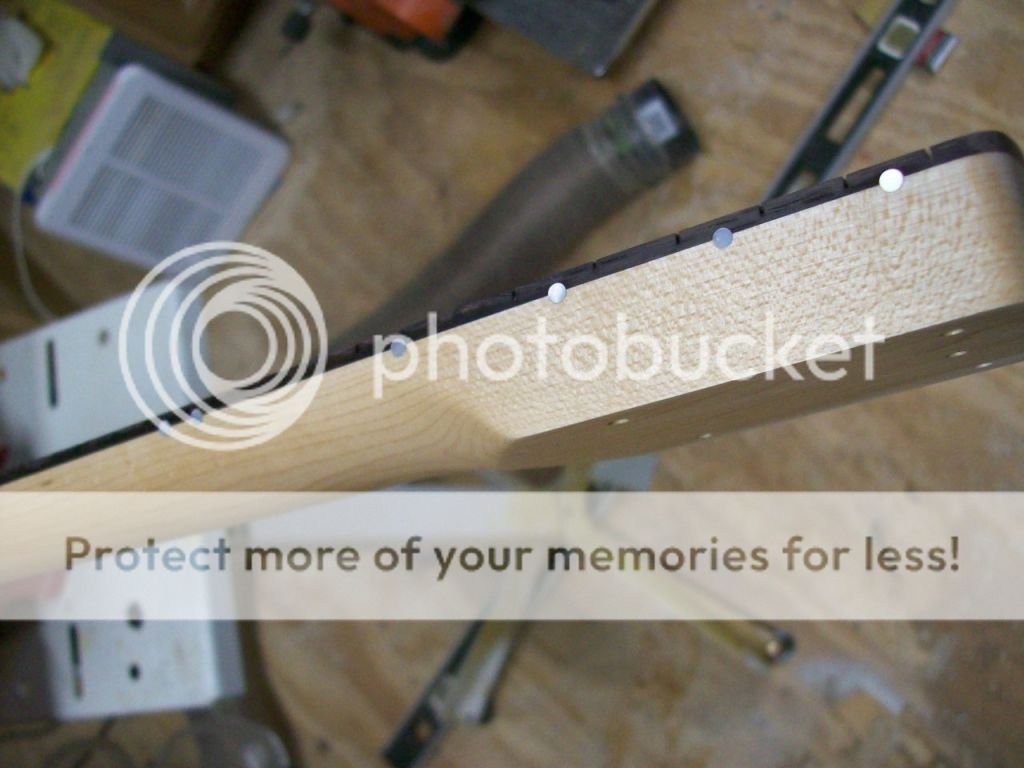
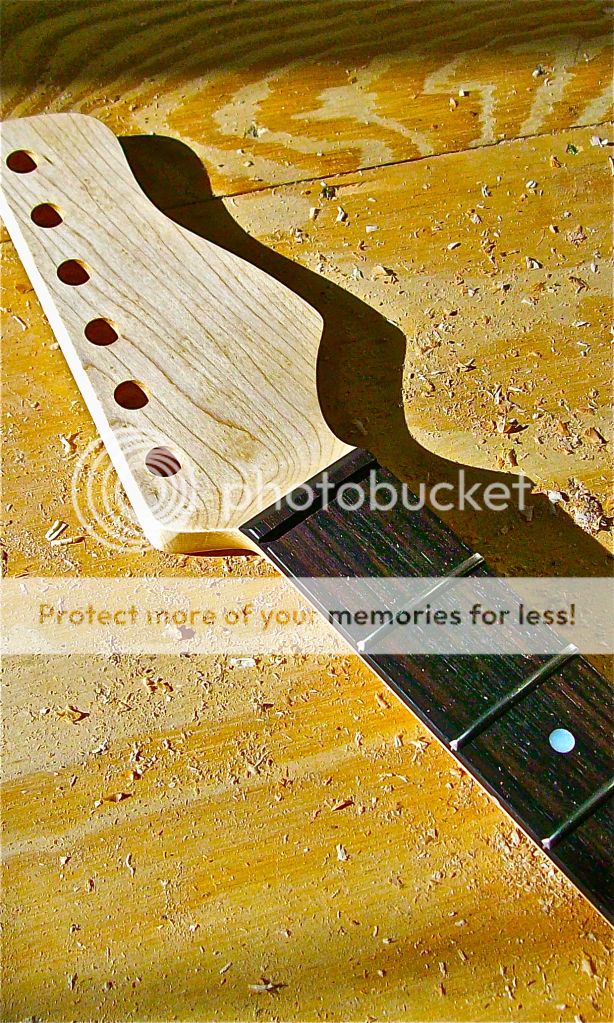
Maple neck with rosewood board
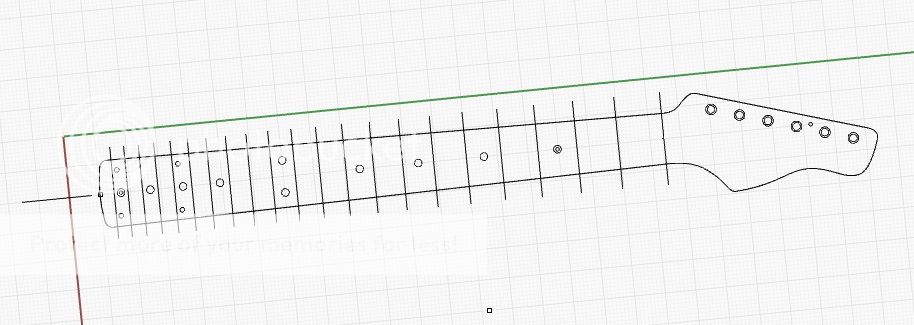
Thin C shape, 21 frets, MOP dot inlays
6-screw vintage trem
Either SSS or HSS...haven't decided yet

First step...the neck...
 
Got some wonderful maple neck blanks from Bell Forest. Good people.

This particular piece has some really cool grain to it even though it's just regular flat sawn maple. They send the pieces in a fairly rough state. They still need to be flattened and trued up to the proper spec. I scribble pencil on one side and then put it on the jointer. When the pencil marks are all gone, I know the entire surface has been taken off. The jointer is the machine that flattens the face. Once you have a perfectly flat face on one side, you can put it through a thickness planer and you will have two parallel (and thus two flat) faces. Obviously, this is pretty key.


Once we're all flat and true, the blank goes on the CNC and the perimeter outline, and truss rod slot are cut:


The extra few inches down at the heel end are a drilling jig of sorts. I'll use that slot in the extra waste area to guide the drill bit into the heel to drill the spot for the truss rod nut.

Somebody asked me...how do you know how to draw/design the neck? Well, it's kind of simple and kind of not.

I start with some known dimensions like the scale length, the nut and heel width (standard strat measurements), and tuner hole locations. The nut and fret locations are obviously driven by the scale length dimensions. The rounded strat heel shape is a known measurement, too. From there, the headstock is drawn from scratch "around" those other specs. The headstock doesn't play much of a functional role other than giving you a place to hang the tuner holes. The mass effects the tone, IMO, but I'm not even going to go there... ;)
 
That the "simple" part. The not so simple part is programming the machine to cut what you've drawn. The software does most of the heavy lifting. You do things like select the curve that defines the outer perimeter of the neck, and tell the software that you want to cut outside that curve with a .5" diameter cutter. You want to cut it .75" deep, and you want to do it in 3 passes, .25" for each pass. That's pretty simple too.

neckcad.jpg


But you need to account for things like runout (the router bit is never spinning 100% straight, due to manufacturing tolerances in the bit and the router, etc) so it will actually cut a bit wider than you expect. We're talking thousandths of an inch, but it still matters. And you have to decide how you're holding the material on the table. If your material is clamped to the table, you have to program the cutter to make sure it goes around the clamp!

You have to account for all the sanding that will come later. Sanding will obviously make the piece smaller. So on and so forth. It's a metric shit-ton of trial and error and wasted wood, at least in my case! But once you get all that stuff sorted out, it works really well and you can do it over and over and over.

Somebody else asked - how much faster is the CNC than doing it by hand? The answer is, it's usually slower. But the advantages are many. You can change designs very easily. Once you have programmed the machine, it won't forget. It always pays attention (unlike the operator!). The sharp spinny things are further away from your hands and face - always a bonus. And after you've done all the upfront work, you can drink coffee and eat a donut while the chips fly.
 
Thanks for taking the time to write all that Mike, really cool to see you get to where you are today in regards to building guitars. To be honest when you first announced this hobby I thought you were nuts :D

Get your logos yet?? :)
 
Digital Jams":24zvk92v said:
Thanks for taking the time to write all that Mike, really cool to see you get to where you are today in regards to building guitars. To be honest when you first announced this hobby I thought you were nuts :D

And you were right!

I've got the bank statements to prove it...
Digital Jams":24zvk92v said:
Get your logos yet?? :)

By the time this is finished, we will have a batch... :thumbsup:
 
The vintage style one-way truss rod gets installed then it's fretboard time. The fretboard also came from Bell. And like the neck blank, it comes in a rough-cut state. So it gets flattened and trued-up as well.

Then it gets glued onto the neck and after a couple of days drying, gets trimmed flush to the neck shape:

 
Next step is to carve the neck. I designed a new thinner carve for this one. The CAD looks like this:


I've learned the hard way that the first test of a new design/cut doesn't always work out as planned. After wasting a LOT of wood over the past couple of years I finally smartened up. Here's the first test cut, in some rigid foam insulation:


Sure enough, since I took the time to test it out, it worked perfectly the first time. :doh: Oh well, still worth the trouble...
 
Really cool. Just went through the first build thread. Great looking guitar. 50s Teles are my favorite. I'll be following this build, too.
 
So the neck back of the neck gets carved for real (sorry no pics), then the neck gets flipped, the headstock gets carved (thinned out), and the fretboard radius, fret slots, nut slots, and inlay all get milled. With an eternity of sanding in between each (nobody ever tells you about that part!)...

Here are the fret slots getting cut. The fretboard is already radiused, inlaid, and sanded at this point, so that the depth of the fret slot won't be changed after I cut it, by sanding. If you cut the slots first, then sand the board, the slots get shallower. Simple math :D.

The slot gets cut to match the depth of the particular fretwire with just a few thousandths to spare, so there won't be any unnecessarily large gaps under the fret tang...


The side dots are done, off the CNC, after the fret slots are cut (and/or after the neck is fretted). I just eyeball the location, and drill it by hand. These are 3mm MOP dots. They're very thin, so you have to be careful not to drill the hole too deep. I like big side dots...no point in having side dots that are hard to see!

This is what it looks like after most of the sanding has been done, just prior to the frets going in. I'm shooting for an invisible glue line between the neck and fretboard, perfectly aligned dots with no gaps and no filler, and a nice break/transition from the rounded back of the neck to the side of the fretboard.

100_1089.jpg
 
Frets get pressed in using the Stew Mac fret press thingamajig. Then trimmed flush and slightly bevelled. We'll wait until final setup time to fully level and dress the frets.

Tuner holes get drilled. I have a set of Schaller minis on the shelf for this project.

The neck gets a coat or three of Watco Danish Oil. It brings out the color and protects the wood, while still leaving it feeling pretty raw. The fretboard gets a coat of Roche Thomas fretboard oil.

And voila, a mostly-finished neck.

100_1108.jpg
 
Back
Top