The making of a NGD...let's build another one...

Digital Jams":1bruchpy said:
NOICE!

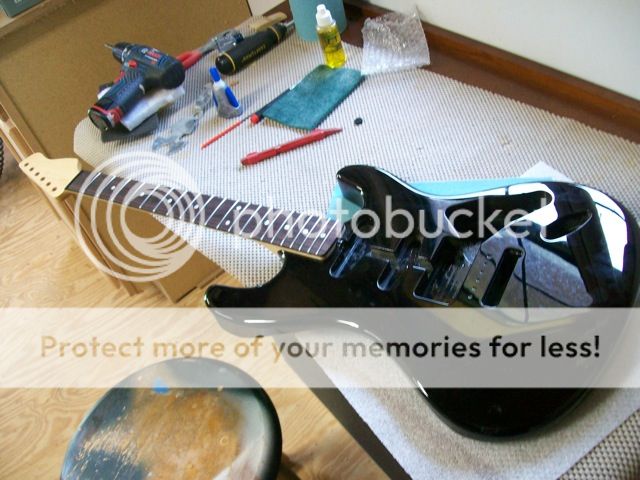
I see lots of bodies on the floor, anything worth anything??

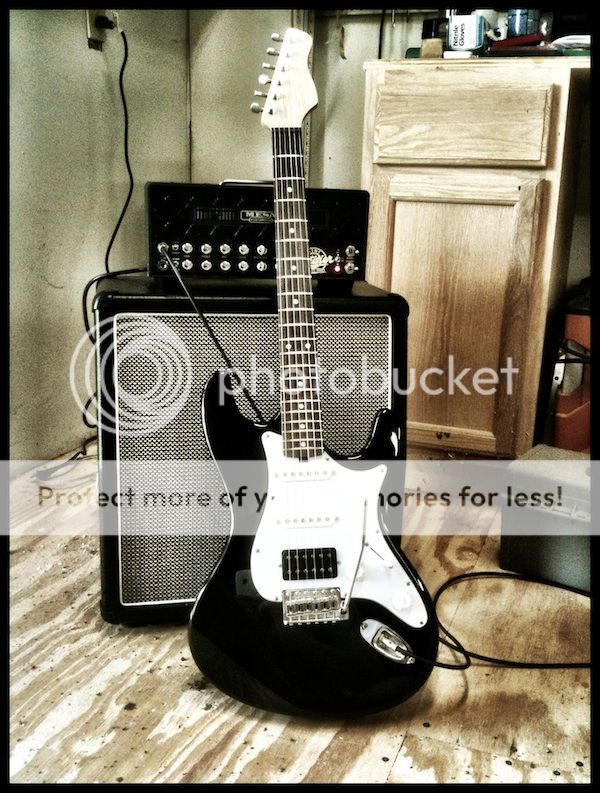
I am liking the Pacer influence, great playing comfortible design :thumbsup:

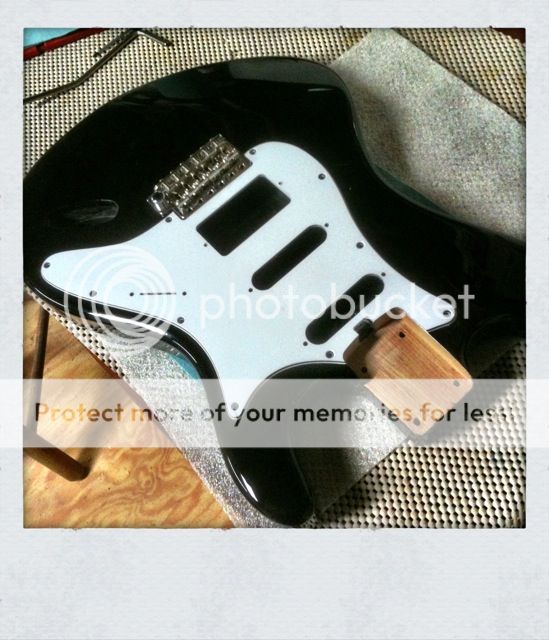
Nah...old test cuts piled here and there. Bodies, necks, guards, etc. The only other thing still in play is the setneck proto stuck on the wall there. It will see the light of day again hopefully fairly soon.
 
Alright...back to business.

As mentioned, the body is back from the painter. To put it nicely, the paint is not up to snuff. It's good enough for my purposes as a proto, though, and we'll chalk it up to an expensive lesson learned.

Testing the neck for fit. I was a little nervous about this because it was a nice slip fit before paint. It still is. The paint is extremely thin, so that's good at least...

But if you look close you can see one of many flaws...a little chip on the roundover up against the neck.

100_1137.jpg


Ahh well. It looks great from 6+ feet away. :LOL: :LOL:

100_1133.jpg


The next thing I wanted to get to was to cut the pickguard. I didn't want to go with a standard strat guard. I can't actually, since the body isn't a standard strat body. So I came up with this:

guard.jpg


HSS, with a single volume and single tone controls. Simple 5-way switch. And a notch to accommodate the EBMM style truss rod wheel.
 
I decided on a 3-ply WBW material. I have enough on hand for two guards, which is a good thing because I hosed the first attempt. :D

I first cut the outline very shallow on the CNC table so that I know where to place the material. I put the material down and drill all the mounting holes:

100_1140.jpg


100_1142.jpg


100_1144.jpg


Then I can use those holes to mount the material to the table.

Things were going great. The very last operation was to countersink the mounting holes. In order to get to the holes, I have to remove the screws. So I pulled the screws and used double-stick tape to hold the guard to the table then started the countersinking. On the very last hole (of course!! :doh: ) the bit pulled the material up off the table and blew the hole out. Apparently the double-stick tape holding down the material wasn't holding well enough.

So I wised up the second time around and did the countersinking of the holes at the drill press instead. :student:

I think this was the second guard about halfway through...

100_1145.jpg
 
As simple as it looks getting the pickguard lined up exactly to all the parts from the neck, bridge, and pups is tough and takes time. Plus you are working on top of the paint so you have to be careful in that regard as well.

Coming out great Mike :thumbsup:

What kind of knobs are you going to use? I am thinking old school Ibby knobs myself.
 
Digital Jams":2h9cfdkw said:
As simple as it looks getting the pickguard lined up exactly to all the parts from the neck, bridge, and pups is tough and takes time. Plus you are working on top of the paint so you have to be careful in that regard as well.

Coming out great Mike :thumbsup:

What kind of knobs are you going to use? I am thinking old school Ibby knobs myself.


Well as far as working on top of the paint goes, not really worried about that anymore. It wasn't pristine to begin with. Then I let my 1 year old handle it and she whacked something against it and put a nice old gash in it. Free relic'ing!

Regular white strat knobs at least for now...
 
I don't have many pictures of the next operations because a lot of them are "two-handers" and I forget to stop and take pics.

But they include...

1. Level the frets in advance of mounting the neck.
2. Install tuners and rough shape nut.
3. Mount the neck.
4. Drill and mount the trem claw.
5. Mount the trem.
6. Shield the pickguard and mount the electronics.
7. Shield the cavities (haven't done this yet.)
8. Wiring.
9. Strap buttons.
10. Slap it together and string 'er up.

I got through all of the above over the weekend. Sliced my finger right in advance of play-testing (that copper foil shielding stuff for the pickguard is sharp...mental note...) But some super glue got me through enough that I could string it up, test the wiring and start setting up a bit.

Inevitably, final assembly illuminates some issues. I have to rework the route for the jack. It's a little too snug. A couple of the pickguard mounting holes need to be moved inward a bit. I tweaked the headstock to put a little more meat above the tuners. Issues that will be fixed next time.

So what's left to do.

1. Shield the cavities (maybe...it's already pretty dead quiet.)
2. Intonate and finish setup.
3. Headstock logo (in the mail...)

So far so good. The first play test was a success...I'm very pleased thus far. LOVE the spoke wheel for the truss. God bless you for that idea, EBMM. Love the Gotoh trem...vintage vibe but a heftier feel.

playtest.jpg
 
Awesome stuff Mike!!! Are you looking to do paint in house eventually or is that too much of a hassle?

Kage
 
Gainzilla":dfi6gsb5 said:
Awesome stuff Mike!!! Are you looking to do paint in house eventually or is that too much of a hassle?

Kage

That's the longer term plan, yeah. I don't have the facilities, equipment, or expertise that I would expect a pro finisher to have. So I expected to be blown away by what I got back. I wasn't...I got back something that I could have done myself, at the very least. So I may try somebody else for the next one or just do it myself...
 
Took some glamour shots at lunchtime...Switchback Guitarworks is the name I've given to my little venture here...

IMG_3783.jpg


IMG_3786-1.jpg


IMG_3815.jpg


IMG_3790.jpg


IMG_3787.jpg


IMG_3794.jpg
 
ratter":3kj3ty2s said:
Digital Jams":3kj3ty2s said:
Yeah paint takes time :no:

Well this one got urethane, not nitro. So it could have been just a few days if not for the backlog. But like I said, no worries. I'm sure it is quality work.

Now I gotta remember wtf I was doing...oh yeah, pickguard. Maybe tomorrow...
Epic thread! One of the best ever here - great work, man!

I have to ask though... Why not just learn to finish the guitars yourself with all the from scratch work you are putting into this? Compared to the rest of this work, it is a piece of cake, especially with urethane...

EDIT: Nevermind, I see you addressed that already...

Glamour shots look awesome!!!

Steve
 
Bob Savage":xoohw6fl said:
sah5150":xoohw6fl said:
Bob Savage":xoohw6fl said:
Finishing is a piece of cake. Steve, you crack me up. :)
I said compared to the rest of this work... :)

Steve

Guitars are probably different but the finishing is one of the toughest parts of the stuff I make.
Yeah, but you are doing stains and stuff dealing with transparent finishes over flamed and quilted maple.

A single color guitar body shot from urethane in a spray can specifically shouldn't be that hard. The only thing that is a bitch is filling the wood. Once that is done, the rest is easier.

Of course, it was too hard for me... My paint kept peeling off... :LOL: :LOL:

crack.jpg


I'm real good at cutting out and putting a sticker on a headstock and shooting 2K gloss from a spray can over it though:

head_1.jpg

head_2.jpg


Good thing I had Marty Bell to do the body for me:

Explorer.jpg


Steve
 
sah5150":3u522pol said:
Yeah, but you are doing stains and stuff dealing with transparent finishes over flamed and quilted maple.

A single color guitar body shot from urethane in a spray can specifically shouldn't be that hard. The only thing that is a bitch is filling the wood. Once that is done, the rest is easier.

Of course, it was too hard for me... My paint kept peeling off... :LOL: :LOL:

I'm real good at cutting out and putting a sticker on a headstock and shooting 2K gloss from a spray can over it though:


Good thing I had Marty Bell to do the body for me:

Steve

Yeah, that guitar came out great and your sticker looks superb. :)

I'm jonesing for a Charvel star.

Alright... I won't sidetrack the thread.
 
Bob Savage":aawb2216 said:
sah5150":aawb2216 said:
Yeah, but you are doing stains and stuff dealing with transparent finishes over flamed and quilted maple.

A single color guitar body shot from urethane in a spray can specifically shouldn't be that hard. The only thing that is a bitch is filling the wood. Once that is done, the rest is easier.

Of course, it was too hard for me... My paint kept peeling off... :LOL: :LOL:

I'm real good at cutting out and putting a sticker on a headstock and shooting 2K gloss from a spray can over it though:


Good thing I had Marty Bell to do the body for me:

Steve

Yeah, that guitar came out great and your sticker looks superb. :)

I'm jonesing for a Charvel star.

Alright... I won't sidetrack the thread.
I'm Floyding my yellow/blue spiral checkerboard star so I can play it. The vintage trem sucks no matter what I do...

Ok, no more side tracking from me either...

Steve
 
I've painted a handful of bodies and a few necks. Mostly nitro but a couple urethane. I'm not sure I'd call it a piece of cake but definitely doable. I just figured I would test the waters in terms of aftermarket finishing.

It sure was nice to send off a raw body and some money and get back a painted body, I'll say that much. But then I suppose I could send off some money to a store and get back a whole guitar and that would be the easiest of all. :LOL: :LOL:

I've got both a turbine spray rig as well as a compressor with ordinary guns. So I guess I'll be dusting them off for the next go 'round.
 
Back
Top